Dynamically setting multiple activity destinations in K2 with ASP .NET
When building a typical workflow you usually know which user or group needs to perform an activity at design time. Sometimes though the workflow needs to be more dynamic.
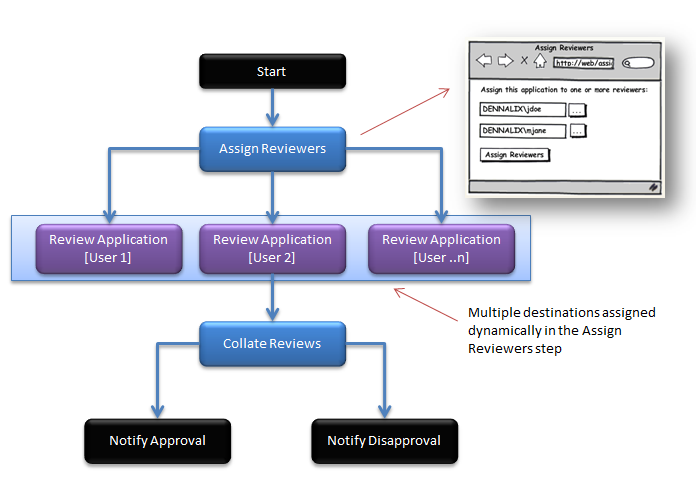
The issue I had to resolve recently involved having to build a workflow where the end-user gets to individually pick the users who will be performing the next step. Here’s a view of the workflow design.
The scenario involved an application being submitted for review. The application would go to an individual who is responsible for assigning a group of users (destination users) to review the application. The twist was that it was the individual picking users for each application, it wasn’t a fixed group or role. The screen mockup shows how they do it.
When the person hits the ‘Assign Reviewers’ button the form then needs to turn up as a work list item for each of the reviewers (destination users) who get to review the application in parallel.
Implementing this process using K2/InfoPath is quite straightforward and is well documented in many places including this post titled ‘Activity Destination Users based upon a Repeating XML element’ in a K2 underground blog.
It’s not well documented though for ASP.NET. The post ‘How To: Use a web service for destinations in K2 blackpoint’ is close to what we want but it’s targeted at using a web service.
K2 let’s you set multiple destination users in one of two ways
-
Using a SmartObject method in a role
-
Using Xml as a destination set
Going the SmartObject route was a lot of work for my simple requirement so I chose the Xml method. The idea here is to use the list of users in the Assign Reviewers form and store them in a Process xml field. The destination set will then be configured to read the xml field and create a slot for each user.
FYI: See page 4 of the Advanced Destinations whitepaper for a description of the two roles. <rant>Why the K2 KB portal needs a login is beyond me.</rant>
Step 1: Write the code to create the xml containing the list of users
The code block below accepts a ; delimited list of domain name\username (e.g. domain\johna) and creates an XML document containing the list of users. This is then assigned to the Process Instance XML field called Reviewers.
private static void AssignReviewers(WorklistItem item, string listOfUsers)
{
var doc = new XmlDocument();
var root = doc.CreateElement("UserList");
doc.AppendChild(root);
foreach (string user in listOfUsers.Split(';'))
{
var userNode = doc.CreateElement("Users");
userNode.InnerText = user;
root.AppendChild(userNode);
}
item.ProcessInstance.XmlFields["Reviewers"].Value = doc.OuterXml;
}
Step 2: Create an xml schema based on the user list xml
This proved to be the trickiest part for me. Using the xsd.exe as documented in this article didn’t work. After a lot of anguish I worked out that K2 was happy with the schema generated by InfoPath. So I opened an empty form in InfoPath and added a repeating text field (screenshot).
Next I exported the form to get to the .xsd (in InfoPath 2010 it is File -> Publish -> Export Source Files). Cleaning out the my: namespace and a bit of tweaking should give you the following schema definition. This definition should work fine with the xml produced by the above code block.
<?xml version="1.0" encoding="UTF-8" standalone="no"?>
<xsd:schema xmlns:xsd="http://www.w3.org/2001/XMLSchema">
<xsd:element name="UserList">
<xsd:complexType>
<xsd:sequence>
<xsd:element name="Users" minOccurs="0" maxOccurs="unbounded"/>
</xsd:sequence>
</xsd:complexType>
</xsd:element>
</xsd:schema>
Step 3: Create an xml field for the process
Armed with the xml schema, we’re now ready to configure the workflow.
Fire up the K2 process designer and add the process xml field name Reviewers which we referred to in our code in step 1.
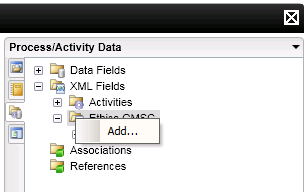
To do this open the Process General Properties window, expand the right panel. From the list select the Process/Activity Data node, expand it to select the name of your process and right-click on it to click Add.. and get to the Add XML Field.
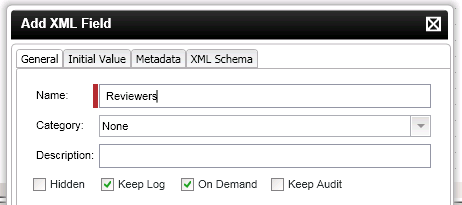
Name the field ‘Reviewers’.
Switch to the XML Schema tab and browse to pick the xsd file created in Step 2.
When you hit OK you should now be able to drill down and see the Users node.
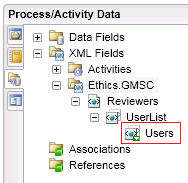
The key is to make sure that the node’s icon has a green overlay which flags it as a repeating node. If it’s there you should be fine. If not you need to repeat the steps above until you get the green overlay icon. Without it, the worklist item is not going to be assigned to multiple users.
Step 4: Setup the destination to read from the xml field
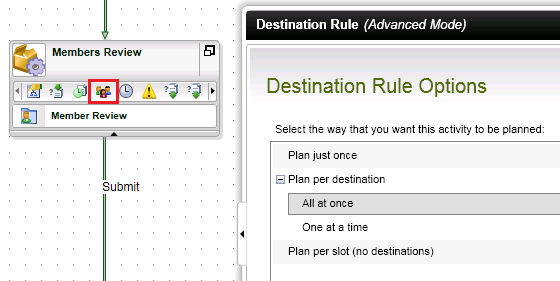
Select the activity which needs to be executed in parallel and click on the Destination Users node. Switch to the Advanced Mode if you are not already in there (select the checkbox on the first page). In the Destination Rule Options select Plan per destination ->All at once. We do this to tell K2 that when it goes to multiple users they will be able to open and work on the item in parallel.
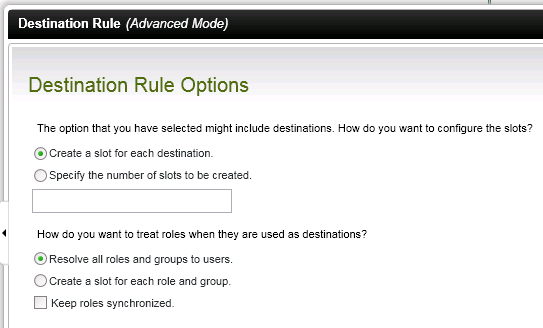
Select ‘Create a slot for each destination’, this way each destination user get’s their own slot.
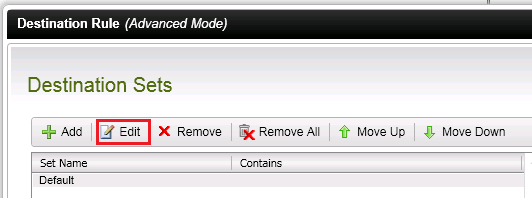
Click on the Edit button to configure the Destination sets.
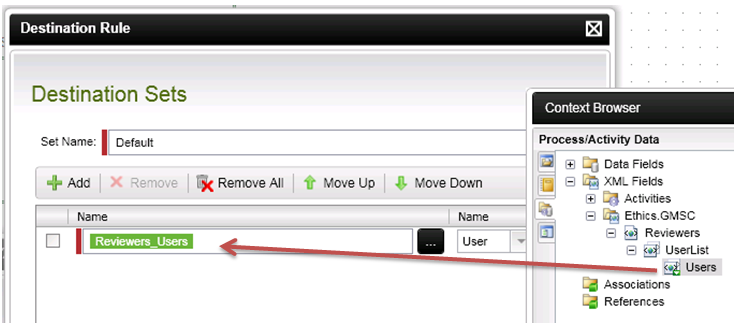
Click on the ellipsis to open the Context Browser, drill down to the Process Xml field that we setup earlier and drag the Users repeating node (the one with the green icon) onto Name column.
You should now be all set to test out your dynamic multiple destination users! Running through the workflow you will now see that the worklist item gets assigned to each of the reviewers in parallel.

